When you are looking at bicycle panniers and other bags/packs, you will notice a wide variety of choices. Some have tremendous volume, numerous compartments and pockets, and lots of auxiliary bags and attachments that you can purchase. You can spend hundreds of dollars. But are you sure that you can or will use some of the extensive systems available?
When I started to write this page, I considered reviewing the available bicycle panniers. However, I didn’t believe that approach would be fair to each bicyclist and manufacturer. From my years of experience, just because one brand or style was appropriate for me,it doesn’t mean that it would be the same for you.
Buying Bicycle Panniers for your Bike Tour
Space Requirements and Bag Configuration
The main issue that you should consider first is how much gear space do you need for your tour. For “sag wagon” to “credit card” touring for short trips of a week or less, you might be able to get by with one or two bags. Yet, if you are going on a lengthy tour but still are staying in motels and eating mostly in restaurants, one or two bags may be insufficient. If you choose to camp out some, a fully loaded bicycle with front and rear panniers and plenty of strapped on gear may be your best choice.
When one or two bags of gear are required, you can choose a large or medium handlebar pack and trunk pack on top of your rear rack. This configuration works wells when your gear weight is fairly light. If you put too much weight in the handlebar bag, your steering will be adversely affected and your center of gravity may be too high. With a center of gravity too high, you may experience an unstable ride. I believe you should keep your center of gravity as low as possible.
I recommend that you read my page on rack selection for more information on load configuration.
If you still only need two bags and your gear weight gets heavier, using a pair of front panniers may be your next logical choice. Keeping the heavy weight low on the front wheel doesn’t adversely affect your stability and minimizes steering problems.
As your gear carry requirements increases, adding medium to large capacity rear bicycle panniers may be your next step. I believe the 40/60 ratio of weight on the rear/front wheel should be your goal. Since the rear panniers usually have greater capacity than front panniers, you will need to pack some of the most bulky but lighter items on the rear wheel. The top of the rack can be used for strapped on gear or a trunk pack.
When you examine different pannier models, look at the number of inner compartments and pockets that are available. Inner compartments can greatly ease packing and finding items on tour, especially if you need a separate area to protect a laptop computer. Outside pockets enable you to get at stuff on the road without emptying out the entire pack. But at the same time you don’t want too many bulging pockets that your feet may hit during pedaling.
Weather Proof Requirements
If you have ever been touring in a downpour or an all day rain, then you probably know that you are going to get wet no matter what you wear as rain gear. There is nothing worse than arriving at your night stop, opening up your panniers, and pulling out wet clothes. Consequently, I believe that no matter which brand of panniers that you buy, you have to be able to keep your clothes and gear dry. So what are your alternatives?
- Stuff all your clothes in plastic bags. Almost all brands of bicycle panniers are at least water resistant. That means that the material will shed drizzling rain, some road water, and snow. It doesn’t mean that the zippers, openings, pockets, and flaps will keep water out. To keep your clothes dry in these panniers, you need to stuff all your clothes in at least one sealed bag (two bags are better) and then store everything in the panniers.
- Attach rain covers to the panniers. When you buy the panniers, buy a rain cover if available. These covers work fairly well for protecting your panniers and contents from rainstorms. However, most of the covers only cover the top, sides, and outsides of the panniers. If the panniers is not completely enclosed within the rain cover (back and bottom too) and sealed tightly, water kicked up from the road and puddles will be thrown up and inside the rain cover. I suggest that even when you use rain covers, still enclose your clothes in sealed plastic bags.
- Buy waterproof panniers and bags. Some manufacturers offer 100 percent waterproof bags. This guarantee assures you that rain and kicked-up water will be repelled by the panniers and bags. It doesn’t mean that if you toss the bag into a lake, that your clothes will stay dry. If you need that kind of assurance for your clothes, a few bicycle panniers have a rolled up closure with 100 percent waterproof material that will make your pannier a dry sack. The gear in these models will survive a complete submersion in a lake.
Panniers to Rack Attachment
Ortlieb
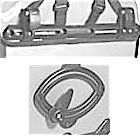
Carradice
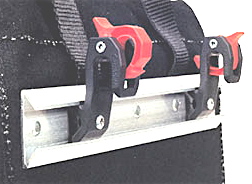
Arkel
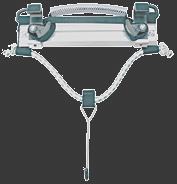
Above you will see a few of the available quality mounting systems. All of these systems are easy to attach and detach from most bicycle racks. Some of the precautions that you should check before purchasing any of these or other brand of bicycle pannier systems are:
- Attach and detach without or with special tools
- Height of pannier hanging on the rack
- Clearance of mounted pannier from your feet
- Clearance of mounted pannier from the wheel
- Stability of the pannier against the rack
- Strength of mounting system
- Ability to lock the panniers or secure with separate locking device
If I am going to be away from my bicycle for any length of time, I either lock the panniers on the bicycle or take the panniers with me. So if you usually take the panniers with you, make sure that they can be detached and attached fairly easily but still stay secure against the rack during your ride.
How Durable Are They?
When traveling on the road or a backwoods trail in a foreign country, the last thing that you need is a broken pannier attachment. The chances of finding replacement parts at a local bike shop will be almost nonexistent. So choose a extremely durable and reliable pannier system.
Look at the attachment mechanism: Does it look strong and durable? How about the zippers and buckles? Are they heavy duty? Dip the material in water to see if the seams leak.
I suggest that you attach the bicycle panniers to your racks, load them up, and take a short ride. Do the panniers go on and come off easily? Do the bags sway as you go up a hill? Do the panniers hit your wheels while you turn or your heels when you spin the pedals?
If you have any doubts after going through these steps, then keep on looking at different brands. Road wear and tear are extremely rough on a tour. So choose wisely on the brand. It will be cheaper to pay up front than later on the road.
Some Quality Bicycle Panniers
Below I have listed a few bicycle panniers that I am experienced using on tours or have examined their product. There are numerous other quality manufacturers that are not mentioned here at this time. I will review these other brands when I become more familiar with them.
- Carradice. For the past 60 years, they have been manufacturing a wide range of bicycle panniers from daily commuter brands, bags for expeditions, and specialty packs for recumbents and tandems. Materials include 600 denier polyester with reinforced PVC nylon and cotton duck, depending on the model. Their bags are well known for protecting your gear from rain and road spray. Their C-system pannier hooks offer instant and secure fixing to your rack.
- Ortlieb Their bicycle panniers and bags have been proven on countless expedition bicycle tours. Some of their models, like the roll top, are legendary for being 100 percent waterproof. The main material they use is Cordura fabric that is extremely durable. Straps and zippers are heavy duty and will last year after year. They offer the QL1 and QL2 mounting system that works on a variety of racks. They also have an optional secure cable system that is easy to use.
- Arkel . Arkel manufactures an extremely wide variety of bicycle panniers, bags, and packs for about any type of touring that you will do. They offer a wide range of color for visibility and preference. Their packs are weather resistance to rain and road spray, but they offer internal plastic liners for most of their brands and rain covers. Their standard mounting system is easy to use and very secure. I think that it is one of the most durable systems on the market.

Hi
Would you offer your thoughts about fore/aft mounting of panniers on ones rack. Is there any logic to placing the center of the pannier as close to the center of the rear axle as possible-assuming heal clearance. Or does it not make any bike handling difference in or out of the saddle?
Also considering bigger canti ‘overhang’ that might or might not be interferred with by the panniers.
Thanks for any comments
lenny
Hello Lenny,
Leanne here!
Good question. In my experience, I have found that the placement of the pannier doesn’t really matter as long as it’s centered. Obviously, an off-center pannier will cause more strain on your legs and abdomen as your struggle to keep the bike upright, not to mention the safety issues of having a titled cycle on the road. If the pannier is centered, its proximity to the rear axel won’t noticeable affect the handling. The feeling of extra weight would be just the same if you had a backpack or trailer in tow.
For bikes with larger cantilevers, you’ll need to adjust the items on the pannier so that they don’t interfere. But, like I said, such an adjustment won’t make a difference in how the bike handles, assuming it is centered.
I hope this helps!
Leanne
I would like to say that I had custom panniers made from Black Star bags in Portland, Oregon and they have been amazing. They are 100% water proof. I was touring the San Juan Islands, one of the days we had very heavy rain (for up to eight hours) and all of my stuff was dry. They are worth checking out. Made right here in Portland, they use a metal piece to attach to the rack (no breakable clips) and you can choose from a variety of colors. I was shopping around for months before deciding on Black Star after customizing my own they were still within my budget. They are a small company the person who helps you choose your colors is the same person who will cut your fabric. I love my bags and eight months later they still look brand new.
I am guessing that you get some funding from advertisers and gear samples but what about DIY equipment like bucket panniers. I have read dozens of blogs and why doesn’t any of them say “and if you can’t afford to purchase all this expensive equipment” you can make some.