 Everyone packs too much on their first lengthy bike tour. I felt like I was carrying at least ten pounds too much on mine. After a few days, I looked in my bag only to realize I probably could have eliminated more than half of what I brought.
You never know what might happen, which makes packing and planning difficult. Depending on where you’re touring, you should try minimizing your load to include only the absolute essentials.
Every person will have different needs on their tour, so pack carefully and think ahead as much as possible. However, it’s as important to decide what to bring as it is to decide what leave behind.
Now that I’ve had a few more successful touring experiences since my first, I can plan my packing more efficiently. Some things I‘ve learned are only insights you can gain through experience, so I’d like to share my ideas with those of you who will be touring for the first time
Tips for Minimizing the Essentials on a Bike Tour
Touring with an outrageously heavy load is not fun, so start with these essentials. Not only will the come in handy, but they’ll also help you keep your load as light as possible.
Layers of Clothing
On my first bicycling tour, I didn’t have the greatest gear. Instead of spending money on lightweight, insulated shirts and jackets, like this Pearl Izumi Barrier , I tried saving money and packing the sweatshirts and jackets I was used to wearing.
As you can imagine, a single sweatshirt practically took up an entire pannier. Before your tour, consider investing in lightweight layers. You’ll only need a few, and you can bulk up or strip down depending on the day.
I’d recommend going through REI for that. They consistently have great sales and deals on cycling clothing.
You’ll also need to consider the days when you’re off your bike. Whether you’re hiking up the slopes or hitting up the local town for a few hours, your bike gear might not be appropriate. So, you should buy clothing that functions as both.
Instead of wearing intense spandex racing shorts and shirts, buy clothing that you feel comfortable wearing off your bike for tours that are longer than one day. That way, you won’t need to pack extra clothing in addition to your layers. Something like these prAna Monarch pants are ideal.
Of course, you’ll need to plan accordingly if you’ll be stopping at any hotels or other accommodating areas where you can do laundry and sleep without layers. You’ll need to plan your layers based on the type of tour you’ll take, but layers are the best place to start.
Water Bladders and Containers
For long tours, Camelbak or similar brands of water bladders that you can sip while you ride are ideal. However, these sometimes don’t have a very large capacity, and it’s important that you carry approximately one gallon at all times.
You should supplement your water bladder with another water container as an extra supply. You should only refill your containers with water from faucets, because you could get very ill from drinking out or lakes or ponds.
If you’re picky about the water that you drink and wish you could bring bottled water for the whole journey, consider getting a single bottle that filters water so that it tastes better. EcoVessel makes one of these.
Filtration water bottles will make all water taste clean, from the water fountain at a fast food joint to the sink water at a truck stop. However, these filter bottles should not be used on fresh water from lakes or ponds. If you’re going to more rugged areas, pick up a SteriPen before your trip to filter your water.
Camping Gear
If you’re going on a self-supported tour, you’ll probably need to top and camp every night. On my first tour, this part of packing was mind-boggling. I couldn’t figure out how to physically pack enough to be comfortable every night. So I wasn’t.
There are a few tricks for packing the minimal amount of camping gear while still sufficiently preparing yourself. First, invest in a down sleeping bag. Down is extremely warm, and it is the most lightweight and compressible material. A great sleeping bag for bicycle touring is the Marmot Hydrogen 30 Degree Down. It’s made with very stretchable fabric and allows you to move around in your bag when camping. You can sit up in it, cook while enveloped in it — it really rocks!
Next, think of your tent as a bug net. Don’t invest in a heavy Kevlar tent for protection. If a bear attacks, he’s going to find his way through either way. Your tent should just be enough to keep bugs and rain out, so go lightweight.
Also consider packing a sleeping bag liner. This will act as a sheet so that you don’t have to wash your entire sleeping bag. Instead, you can even just soak the liner at a campsite and let it air dry. It will also serve as a light blanket for nights when the sleeping bag is too heavy.
Read up on additional bicycle camping gear that we recommend here.
Tools
Unfortunately, there is no way around packing tools for your tour. On my tour, one of my pedals broke and I needed to replace it on the road. I borrowed a fellow cyclist’s extra pedal, but I was grateful that I lugged along my toolkit for the repair.
Tools can be heavy, but your tour could be stopped short without them. To lighten the load, consider splitting up the tools between all of the cyclists. As long as you’re sticking together, you’ll only need one of each item.
Some tools and gear you should consider bringing include:
- Spare tube
- Spoke wrench
- Small pump
- Allen wrench
- Brake cable
- Extra nuts and bolts
- Brake pads
- Duct tape
- Screwdriver
Of course, these aren’t the only things you’ll need on your bicycle tour. You need to consider toiletries, food and outdoor gear such as sunblock depending on your route. However, listed are the items I struggled with most on my first ride, and only after more experience did I learn ways around the problems they presented.
Touring is a fun, rewarding and exciting experience, but a heavy load can put a damper on it. Use these tips for your first ride, and you’ll slowly get the hang of things after you learn what you need and what you don’t.

Two very important topics were either short of the mark or missed..
Minimizing the Essentials
The first tour trial should be a short run of a week out and back home. Before you leave write down on a sheet of paper all of the equipment that you have in your panniers. At the end of each day check off each item that you did not use. At the end of a weeks tour you will be able to refrence your notes and the items that you did not use. This way you can subtract those items that are not necessary.
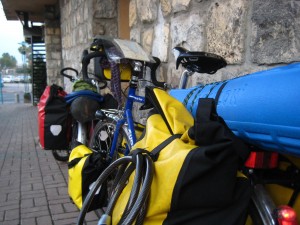
Balancing Your Load
Before I go out on the road I make sure my load is balanced. It greatly improves the safety and comfort of my tour. I normally carry 45 pounds of clothing and repair equipment. I have a device in my garage with a small weighing spring and hook. It is one that looks like a meat store to measure the weight of a package of meat. I weigh the front paniers to find a near to or perfect balance between the two bags/panniers. On the inside of the bags I use large zip lock bags to store what I have in the bag/pannier to keep the items in the bags/panniers dry. I’d never trust a bag/pannier that is resistant to water damage because on the road in a heavy rain things in the panniers are going to get wet. In each bag/pannier I use a two or three inch colored tape to define which zip lock bag goes in which pannier. On a long tour zip lock bags can end up in any pannier because at the end of the day on a long tour you won’t care which bag goes where in the morning before you go back on the road. To keep them sorted by color helps keep the panniers balanced and improves the safety and comfort of your ride. I repeat the same process with the back panniers.
One More Topic
Never Use Bungee Cords To Secure Your Racked Equipment
Bungee cords flex so much that it is common to see then sitting on the road from a truck that might have hit a object or pot on the road. The bungee cord will spring with the bounce of the vechile and release. The same thing will happen on a bicycle. Also bungee cords on a bicycle holding your tent and other equipment can move and wiggle leaving your equipment loose. Use adjustable belts to hold down your equipment. You can tie things down to be very secure. An added aid of the adjustable belts is that if you have a bicycle repair on the road you can hang the bicycle on a tree limb. Lifting the bicycle off the ground gives you a better advantage to work on the bicycle.
Tom
Thanks for those great suggestions, Tom!
Better yet, it’s easier to write down the items that you used as opposed to the items that you haven’t used.
Im 80 , pulling 2 wheeler and no one says nothing about trailers . Why
Here are a few things I do when going on a bike camping trip:
1. For the summer nights or not too cold spring and fall nights, I use a SOL Escape Bivvy instead of a sleeping bag. It’s breathable and keeps me warm when temperatures dip down to about the mid 40s. I supplement it with a Coolmax bag liner for added warmth.
2. For a sleeping pad, I use the Thermarest NeoAir air mattress. It is extremely lightweight, packs into a small size and has very good thermal insulation.
3. For a tent, I use the Big Agnes Fly Creek UL1 or Fly Creek UL2 if I desire more space. Both tents are easy to set up and extremely light.
4. For clothing I wear J&G Cyclewear touring shorts and Zoic Nirvana cycling polo shirts. Both shorts and shirt double as my riding and casual around town wear. I can also use the shorts for sleeping. I also carry a pair of ExOfficio Nio Amphi long pants. All clothings I bring on trips dry fast.
5. Since I do most of my own bike repairs, I do a thorough check on my bike before leaving on a trip. This way I bring a minimum amount of tools to handle mostly adjustments that might be needed during the trip. Of course, components can fail but hopefully I catch most of potential failures during the pre-trip inspection.
6. For footwear I use the Keen Arroyo II sandals. My pedals are flat BMX type with screw studs to keep my sandals from slipping off the pedal.
7. I do most of my bike trips on a Dahon Mu P24 folding bike with a rear rack and a pair of Ortlieb panniers. I can carry the bike on the airplane in a plain looking suitcase and pay the usual $25-30 baggage fees charged by airlines.
I hope the info helps others in planning their bike trips.