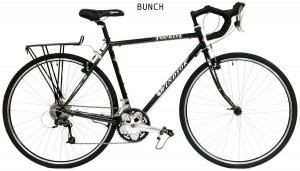
 I’ve created the acronym BUNCH to help myself remember the most important things to check before I go on a bike ride, and it can help you too! It has been instrumental in helping me prevent mechanical problems while on a bike tour.
Especially on a lengthy tour, you might be surprised by how much can go wrong. Your group could get lost, someone could get injured, the weather could be awful and your campsites could be less than glamorous.
While many of these things will be out of your control, there is one very important thing you can easily prevent. By checking the condition of your bike before every ride, you could avoid common mechanical failures on the road.
On my last tour, I created an acronym to help me remember all the things to check before riding. The acronym is BUNCH and it could be the difference between a successful ride and a trip to the bike repair shop.
What to Check Before You Hop on the Saddle
Here you’ll find a list of the basic things you need to check before every ride. Keep in mind, these are basic, and I highly recommend you bring your bike to the shop for an in-depth full body physical before a long tour.
Additionally, you should always keep a set of tools with you on tour in case a mechanical failure does put you on the sidelines. For a full list of these items, check out my fellow touring expert Andy’s article about the top 8 tools you’ll need for repairs on the road.
Once your bike is all fixed up and you have your touring tools packed, it’s time to hit the road.
Use my handy little acronym to keep your bike in prime condition for the duration of the tour and to prevent any unwanted surprises while you’re riding.
B is for Brakes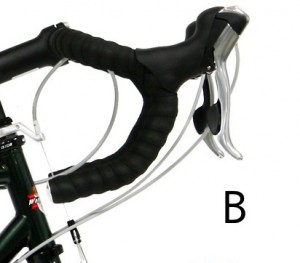
Not only will checking your brakes prevent dangerous situations in which you can’t stop for traffic, but it will also increase the longevity of your bike.
Brake pads are by no means everlasting. In fact, I’ve had brake pads last only a few months before they were rubbed down to the metal.
First, spin both the front and back wheels and apply the brakes. Make sure the pads are applying even pressure.
Next, make sure the cables are in good condition and that they are reacting as soon as you squeeze the brake.
Finally, make sure the brake pads are not hitting the tires at all. If your brakes are rubbing against the tires, the rubber will wear away and you’ll have a flat in no time. Your stop might also be too abrupt if the brakes hit the tires when you try to slow down.
Once you’ve inspected the brakes, it’s time to move on to the next letter in our acronym.
U is for Under-inflation 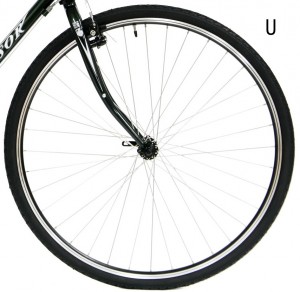
Underinflated tires are the number one culprit for mechanical problems on the road. If your tires are not inflated to the appropriate PSI before you ride, the metal rims will pinch the inner tube against the road and cause it to pop.
This is an easy check. You should bring a small pressure gauge with you when you’re on tour so that you can check your tires any time, any place.
Of course, you should also bring a small pump to inflate your tires when they aren’t at the proper level.
When I tour, we assign one person in the group to bring the pump, since we will all inevitably need it at some point. Sharing a single pump between friends makes more sense than all carrying one individually.
Keeping your tires properly inflated will prevent flats and it will keep the spokes in better condition as well.
N is for Nuts and Bolts 
Have you ever fallen victim to that prank in which your “friends” loosen all the screws to your chair? We can all picture exactly how it ends, and we can all agree we wouldn’t want that happening on to our bikes on the road.
To make sure your bike stays fully assembled while you ride, check all of the nuts and screws before you take off. This is especially important if you have a quick release wheel.
The bumping and grinding of the road could work a few screws loose. Inspect each nut and always keep a screwdriver and wrench handy on the road for any last minute adjustments.
Make sure the handlebars, wheels, frame and seat post are all secure and tightened.
Any part of your bike coming loose while you ride is dangerous, painful and bad for your bike.
C is for Chain 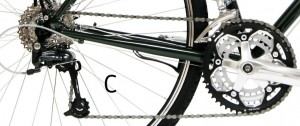
Your bike chain is vital to your ability to go anywhere. For that reason, it is an essential part of your pre-ride check. There are few things you should take note of when you inspect your chain.
Keeping your chain lubed will ensure a smoother ride and will also prevent wear and tear. Chain oil is another one of those items that can be shared by the group you’re touring with.
If your chain looks rusty or dry, it’s time to lube it up.
You should also check to make sure your chain isn’t rubbing against any other part of your bike. Fixing this alignment will increase the longevity of your chain and ensure a safer, easier ride.
Also, make sure your chain is moving properly when you shift. Get your tires spinning and shift the gears. If the chain doesn’t move smoothly and effortlessly on the derailleur, you need to make the necessary adjustments before you ride.
If you’ve ever had a chain problem on a bike ride you know what a headache it can be. My chain once popped off during rush hour on the Mass. Ave. Bridge in Boston on a sweaty summer afternoon. I made it home forty minutes late, banged up, greasy and scowling.
H is for Helmet 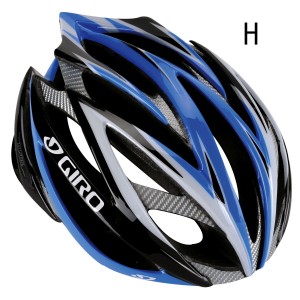
The final item on the BUNCH checklist is your helmet. Wearing a helmet is useless if it is damaged or not properly adjusted.
Before you ride check your helmet for any cracks. Even if it hasn’t been through any impact, the plastic could warp and shift from drastic temperature changes. Upon serious impact, a cracked helmet won’t protect your head as it should.
Also, check to make sure your helmet fits your head properly. You should tighten the strap so that no more than a finger can fit between it and your chin.
An easy way to check the fit is to open your mouth as wide as you can once you’ve secured your helmet. The top of the helmet should pull down on your head. If it doesn’t, you need to tighten the strap.
When you check your bike for mechanical issues, you should also make sure you will be safe on the road. Never forget the last item on your list!
There are a BUNCH of things you need to check before you start any ride. To review, these things are:
- Brakes
- Under-Inflation
- Nuts
- Chain
- Helmet
This checklist is important on a bike tour because by performing it before every ride, you’ll have a better chance of getting through the tour without any mechanical failures.
It’s also an important checklist to go through before a short ride to work or around the neighborhood. It will save you money and frustration in the long run. If you ignore these issues, you’ll either need a repair or you’ll need a new bike sooner than you thought.
I hope my acronym helps you a BUNCH! Checking the mechanics on your bike is one way you can make sure your next bike tour is a success. Good luck!